Battery switch on travel trailer function is crucial for managing your RV’s power. Understanding how your battery switch works is key to preventing electrical problems and ensuring a smooth camping experience. This guide breaks down the different types of switches, their locations, operation, troubleshooting, and maintenance, empowering you to become a confident RV owner.
We’ll cover everything from the basics of different switch types (like 1-2-both and 1-2-off) to advanced topics such as integrating your battery switch with solar panels and shore power. We’ll also address safety concerns and provide practical tips for preventing common issues. By the end, you’ll be able to confidently handle any situation involving your travel trailer’s battery system.
Battery Switch Location and Accessibility
Finding your travel trailer’s battery switch quickly and easily is crucial, especially in emergencies or when performing routine maintenance. A poorly placed switch can lead to frustration and potentially dangerous delays. This section will cover ideal locations, the importance of easy access, and safety considerations.The optimal placement of a battery switch balances accessibility with safety and protection from the elements.
Typical locations include inside a dedicated compartment near the battery itself (often under a hinged access panel), within a lockable storage compartment in the tongue area of the trailer, or inside a weatherproof box mounted on the exterior, but still within easy reach.
Battery Switch Accessibility
Easy access to the battery switch is paramount. In an emergency, such as a short circuit or accidental discharge, quickly disconnecting the battery can prevent damage or even injury. Regular maintenance, like battery checks and cleaning terminals, also requires convenient access. A switch tucked away in a hard-to-reach location or hidden behind other equipment greatly increases the time it takes to perform these necessary tasks.
Consider the accessibility needs of all users of the trailer, taking into account varying heights and physical capabilities.
Safety Concerns Related to Battery Switch Placement
Improper placement can pose several safety risks. A switch located near flammable materials increases the risk of fire in the event of a short circuit or overheating. Placement in a damp or poorly ventilated area can lead to corrosion and potential electrical hazards. Accessibility is key, but ensuring safety should always be prioritized. The switch should be clearly labeled and easily identifiable, even in low-light conditions.
Ideal and Less-Ideal Battery Switch Placement Scenarios
Imagine two scenarios. In the ideal scenario (Diagram A), the battery switch is housed within a weatherproof enclosure, mounted on the exterior of the trailer’s tongue, easily accessible but shielded from direct rain and snow. The enclosure is clearly labeled, and the switch is securely fastened. The area around the switch is free from obstructions.In the less-ideal scenario (Diagram B), the battery switch is located inside a cramped storage compartment beneath the trailer, requiring the user to lie on the ground to access it.
The compartment is poorly ventilated and contains other equipment, making it difficult to reach and potentially exposing the switch to moisture. The lack of clear labeling makes identification difficult.
Operating the Battery Switch
Your travel trailer’s battery switch is a crucial component for managing power and preventing battery drain. Understanding its operation is key to maintaining your RV’s electrical system and avoiding costly repairs. This section will guide you through the safe and efficient use of your battery switch.
Operating the battery switch is straightforward, but requires attention to detail to prevent issues. Typically, these switches are simple on/off toggles or rotary switches. Always double-check the switch’s position before and after use to avoid unexpected power disruptions or battery drain.
Safe Operation of the Battery Switch
Before interacting with the battery switch, ensure your hands are dry and you’re not wearing any jewelry that could create a short circuit. Always turn off any appliances or electronics connected to the battery system before switching the power on or off. This prevents electrical surges and protects your equipment.
- Locate the battery switch. (Refer to the section on Battery Switch Location and Accessibility for details.)
- Visually inspect the switch for any signs of damage, corrosion, or loose connections. If you notice anything unusual, consult a qualified RV technician before proceeding.
- If the switch is a toggle type, move it to the “ON” or “OFF” position as needed. If it’s a rotary switch, rotate it to the appropriate setting. Usually, “ON” will be clearly marked, sometimes with a symbol like a battery with a “+” sign. “OFF” will disconnect the battery from the trailer’s electrical system.
- After making the switch, verify the position. Listen for any unusual noises, and check your connected appliances to ensure the power is either on or off as expected.
Preventing Accidental Switching
Accidental switching can lead to dead batteries or damage to sensitive electronics. Several simple practices can help prevent this.
- Clearly label the switch with “ON” and “OFF” markings, or use colored tape to indicate the position.
- If possible, install the switch in a location that is not easily accessible to children or pets.
- Consider adding a protective cover to the switch to prevent accidental activation.
Problems Resulting from Improper Use
Improper use of the battery switch can lead to several problems. Understanding these potential issues can help you avoid them.
- Dead Battery: Leaving the switch in the “ON” position when the trailer is not in use will drain the battery over time, rendering it useless.
- Damaged Electronics: Switching the power on or off while appliances are running can damage sensitive electronics.
- Electrical System Failure: Corrosion or loose connections at the switch can lead to poor electrical connections and system failure.
- Safety Hazards: Improper handling of the switch can lead to electrical shocks.
Pre-Trip Battery Switch Checklist
Before embarking on any trip, performing a quick check of your battery switch ensures a smooth and safe journey.
- Verify that the switch is in the “OFF” position while the trailer is in storage or not in use.
- Inspect the switch for any signs of damage or corrosion.
- Turn the switch “ON” and check that all connected appliances are functioning correctly.
- Turn the switch “OFF” after your trip and before long-term storage.
Troubleshooting Common Battery Switch Issues
Your travel trailer’s battery switch is a crucial component, and understanding how to troubleshoot problems can save you a lot of frustration (and potentially a dead battery). This section covers common issues and how to address them. Remember, always disconnect the battery’s negative terminal before working on any electrical components.
Common Battery Switch Problems, Battery switch on travel trailer function
Several issues can arise with your battery switch, often stemming from the harsh environment your travel trailer endures. These problems can range from minor inconveniences to complete electrical failures. Let’s examine the most frequent culprits.
- Corrosion: Moisture and salt air are battery switch’s worst enemies. Corrosion can build up on the terminals and the switch itself, hindering electrical conductivity and potentially causing overheating.
- Loose Connections: Vibrations during travel can loosen connections at the battery, the switch, and the wiring harness. This results in poor or intermittent power.
- Switch Failure: The switch itself might fail due to age, corrosion, or simply wear and tear. This could manifest as an inability to turn the switch on or off, or inconsistent power.
Troubleshooting Steps for Battery Switch Problems
A systematic approach is key to efficient troubleshooting. Begin with a visual inspection, then progress to more involved checks if necessary.
Visual Inspection of the Battery Switch
Before you even touch a wrench, carefully examine the switch. Look for:
- Corrosion: Check the terminals for white, green, or blue powdery buildup. This is a clear sign of corrosion. Look closely at the switch itself, too – corrosion can sometimes accumulate under the switch cover or on the switch housing.
- Loose Connections: Ensure all wires and cables are securely fastened. Gently wiggle the wires to see if there’s any play. Pay attention to the connection points at both the battery and the switch.
- Physical Damage: Look for cracks, burns, or any other signs of physical damage to the switch housing or terminals. A damaged switch will likely need replacement.
Systematic Troubleshooting Flowchart
This flowchart Artikels a step-by-step approach to diagnosing battery switch problems:
- Inspect Visually: Check for corrosion, loose connections, and physical damage (as described above).
- Clean Terminals: If corrosion is present, carefully clean the terminals using a wire brush and baking soda paste. Rinse with water and allow to dry completely.
- Tighten Connections: Ensure all connections are secure. If any are loose, tighten them carefully.
- Test the Switch: Try turning the switch on and off. If the problem persists, move to the next step.
- Check Battery Voltage: Use a multimeter to measure the voltage at the battery terminals. A low voltage reading indicates a battery problem, not necessarily a switch issue.
- Check Wiring: If voltage is good at the battery but not at the switch, there is likely a problem with the wiring between the battery and the switch. Inspect the wiring for breaks or damage.
- Replace the Switch: If all else fails, the switch itself might be faulty and require replacement. Consult your owner’s manual for specific instructions or seek professional help.
Battery Switch Maintenance: Battery Switch On Travel Trailer Function
Keeping your travel trailer’s battery switch in good working order is crucial for reliable power. Regular maintenance prevents problems down the road and ensures your batteries are always ready when you are. Neglecting maintenance can lead to corrosion, poor connections, and ultimately, battery failure.
So, you’re an audiophile who travels? Awesome! Planning your next trip? Check out this guide on audiophile travel setups for tips on keeping your sound quality high even on the go. It’s all about packing smart, choosing portable but quality gear, and knowing how to optimize your listening environment wherever you end up. If you prefer a more secluded getaway, then you might want to also browse audiophile travel setups for ideas on creating a tranquil listening experience in remote locations.
Remember, good sound doesn’t have to stay home!
Preventative Maintenance Schedule
A simple preventative maintenance schedule can significantly extend the life of your battery switch. This involves regular visual inspections and occasional cleaning. Ideally, you should inspect your battery switch every three months, or before and after each extended trip. A more thorough cleaning and inspection should be conducted annually. This schedule helps identify potential issues early, preventing more serious problems.
Cleaning and Maintaining Battery Switch Connections
Clean connections are essential for efficient power transfer. Corrosion on the battery switch terminals can significantly reduce current flow, leading to weak battery performance. To clean the connections, first disconnect the battery’s negative terminal. Then, use a wire brush or sandpaper to remove any corrosion from the terminals and the switch itself. Apply a corrosion inhibitor, such as dielectric grease, to the cleaned terminals before reconnecting them.
This prevents future corrosion and ensures a solid electrical connection. Remember to reconnect the negative terminal last.
Identifying When a Battery Switch Needs Replacement
While battery switches are durable, they do eventually wear out. Several signs indicate the need for replacement. These include persistent corrosion despite cleaning, difficulty switching the battery on or off, a consistently loose connection, and visible damage to the switch itself, such as cracks or melting. If you notice any of these issues, it’s best to replace the switch to prevent further problems and ensure safe operation.
Replacing a faulty switch is safer than dealing with intermittent power issues.
Safely Replacing a Battery Switch
Replacing a battery switch requires disconnecting the battery to prevent electrical shock. Begin by disconnecting the negative battery terminal first, followed by the positive terminal. Then, carefully remove the old switch, noting the wiring configuration before doing so. Install the new switch, ensuring the wiring is correctly reconnected to match the old configuration. Reconnect the positive terminal first, then the negative terminal.
Finally, test the new switch to verify it’s working correctly. Remember, always consult your trailer’s manual or a qualified technician if you’re unsure about any step in this process. Improper installation can lead to electrical hazards.
Battery Switch and Electrical System Integration
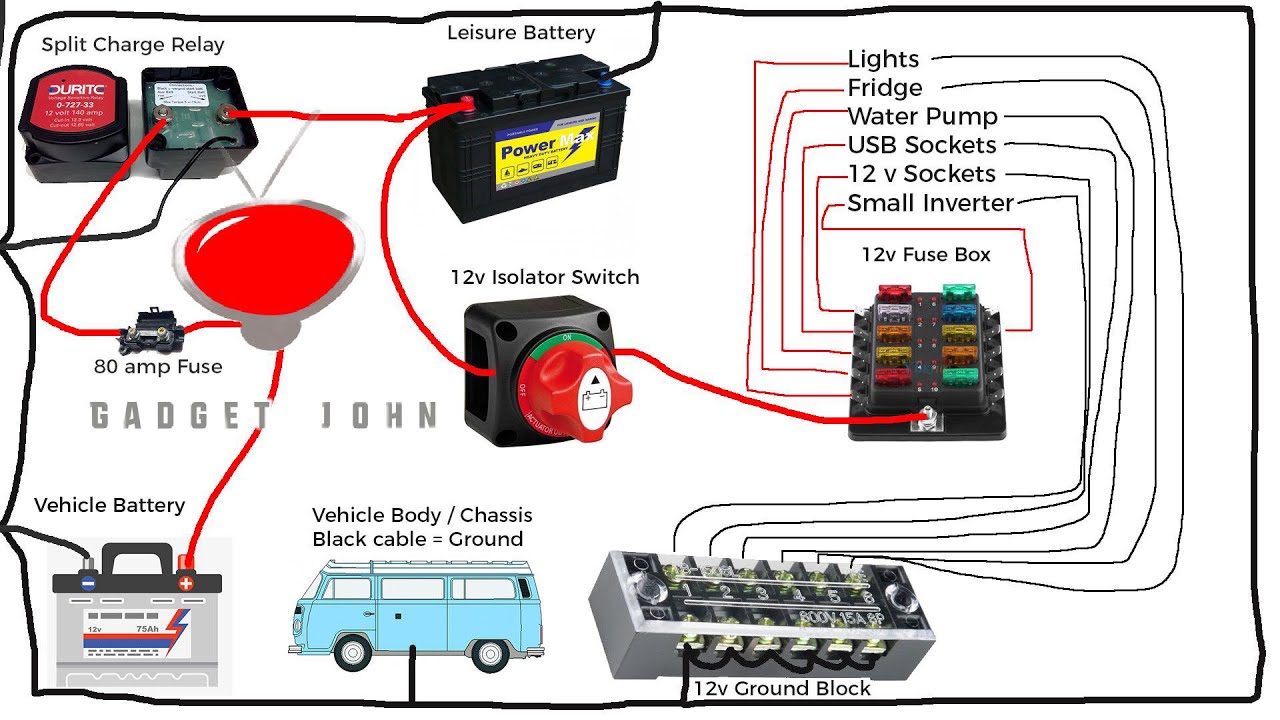
Your travel trailer’s battery switch is the central control point for your DC power system, acting as a gatekeeper for the flow of electricity from your batteries to various components. Understanding its interaction with other parts of your electrical system is key to efficient and safe power management. This section will explain how the battery switch works in conjunction with other electrical components and Artikel different wiring configurations.The battery switch’s primary function is to disconnect your house batteries from the rest of the electrical system when not in use, preventing parasitic drain and protecting your batteries from damage.
This switch manages the flow of power from your batteries to appliances, lights, and other DC-powered devices. When the switch is “on,” the circuit is complete, allowing power to flow. When “off,” the circuit is broken, stopping the power flow. This simple action has significant implications for the longevity and performance of your batteries and overall electrical system.
Power Flow Management with the Battery Switch
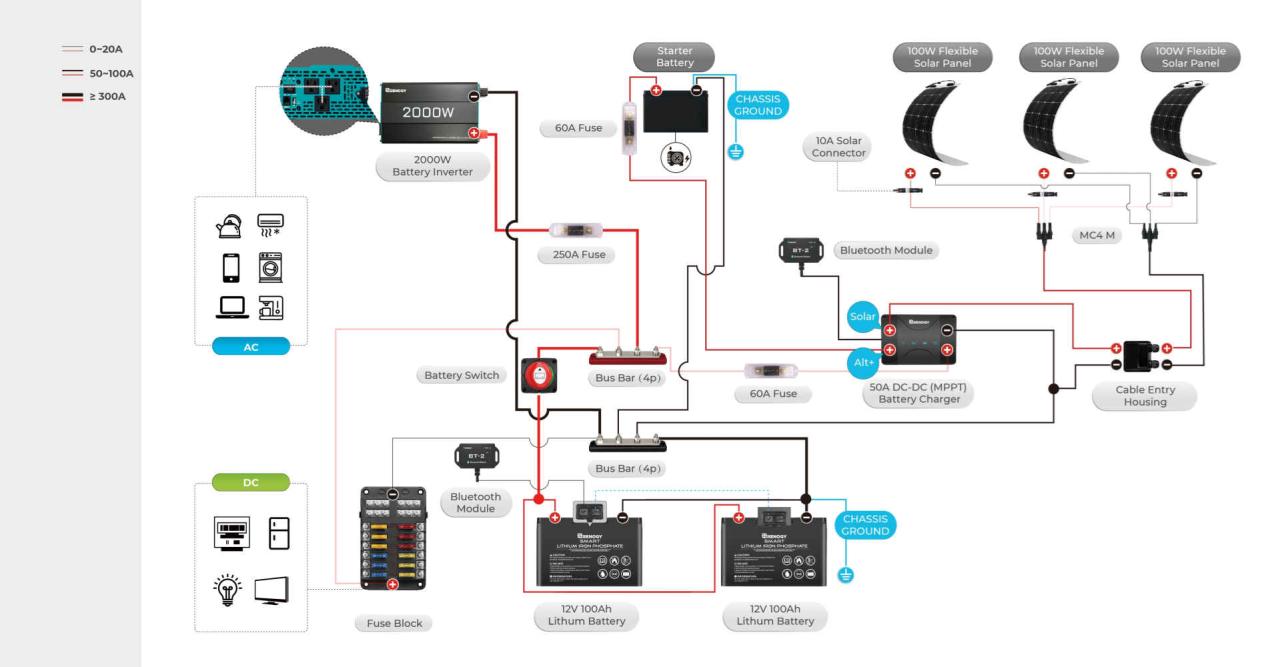
The battery switch sits at the heart of your trailer’s DC power system. When shore power (from a campsite hookup) is connected, the converter typically charges the batteries and powers the 120V AC appliances. The battery switch is often left on in this scenario, allowing the batteries to charge while simultaneously powering 12V DC appliances. When you’re off-grid, relying solely on battery power (perhaps supplemented by solar), the battery switch is essential.
Turning it on connects your house batteries to the 12V system, powering your lights, water pump, and other DC appliances. Turning it off completely isolates the batteries, preventing any unwanted drain. Solar panels, if installed, will typically charge the batteries regardless of the battery switch’s position, although some systems may incorporate the switch into the solar charging circuit.
Wiring Configurations and the Battery Switch
Several wiring configurations exist, depending on the complexity of your trailer’s electrical system and the addition of features like solar panels or generators.A simple configuration involves a direct connection between the battery and the battery switch, which then connects to the 12V DC distribution panel. All 12V appliances are wired to this panel. A more complex setup might incorporate a charge controller for solar panels, which would be wired to the batteries but operate independently of the battery switch.
So, you’re an audiophile who travels? Awesome! Planning your next getaway? Check out this guide on creating the perfect audiophile travel setup for your next vacation. It’s all about packing light but smart. Then, if you prefer something more secluded, consider these tips for an audiophile travel setup in a remote location; it’s all about prioritizing portability and sound quality.
Remember to pack your favorite headphones and a portable DAC for optimal listening pleasure, no matter where your adventures take you!
In this case, the solar panels charge the batteries even when the battery switch is off. Another variation involves a generator, which might charge the batteries through a separate charging system that also bypasses the battery switch. Some systems might include a second battery switch for additional battery banks or auxiliary power systems.
Simplified Schematic Diagram
Imagine a simple diagram: Two battery terminals are connected to the input of a battery switch (depicted as a simple on/off switch). The output of the switch is then connected to a fuse, protecting the wiring from overcurrent. The output of the fuse leads to a 12V DC distribution panel. From this panel, individual circuits branch out to various 12V appliances (lights, water pump, etc.).
A separate line from the shore power inlet connects to the converter, which is also connected to the batteries, allowing charging from shore power. Finally, a separate line (in systems with solar) connects from the solar panels to a charge controller and then to the batteries. This setup illustrates how the battery switch acts as a central on/off control for the battery’s power distribution.
The solar panel and shore power connections charge the batteries independently of the battery switch’s state.
Safety Precautions Related to Battery Switches
Working with batteries and electrical systems in your travel trailer requires caution. Improper handling can lead to serious injury, including burns, explosions, and electric shock. Understanding and following safety procedures is crucial for preventing accidents and ensuring a safe RVing experience.
Battery systems contain corrosive acids and generate flammable gases. Electrical components can carry high voltages capable of causing severe injury or death. Therefore, always prioritize safety when working near or with your travel trailer’s battery switch and related components.
Safety Hazards Associated with Batteries and Electrical Systems
Several significant hazards are associated with working around batteries and electrical systems. These include the risk of chemical burns from battery acid, explosions due to the release of flammable hydrogen gas, and electric shock from high-voltage components. Improper handling can lead to serious injuries, damage to equipment, and even fires.
Safety Precautions When Working with or Near a Battery Switch
Before undertaking any work near your travel trailer’s battery system, it’s essential to take several safety precautions. These precautions will minimize the risk of accidents and ensure your safety.
- Always wear appropriate personal protective equipment (PPE), including safety glasses, gloves (preferably rubber or nitrile), and closed-toe shoes.
- Ensure adequate ventilation to disperse any flammable hydrogen gas that may be released from the batteries.
- Keep a fire extinguisher rated for Class B (flammable liquids) and Class C (electrical fires) readily available.
- Never smoke or use open flames near batteries.
- Avoid wearing loose clothing or jewelry that could become entangled in moving parts or create a risk of short circuits.
- Always disconnect the negative (-) battery terminal first and reconnect it last when working on the battery or electrical system.
Importance of Disconnecting the Battery Before Performing Maintenance
Disconnecting the battery before performing any maintenance on your travel trailer’s electrical system is paramount. This prevents accidental short circuits, electric shocks, and damage to sensitive electronic components. Always disconnect the negative (-) terminal first to eliminate the risk of accidental grounding.
Safety Poster Design for Travel Trailer Battery Systems
A safety poster would effectively communicate crucial safety information visually. The poster should be placed near the battery switch location for easy reference.
Visual Description of the Safety Poster: The poster would feature a large, bold warning symbol (such as a lightning bolt inside a triangle) with the words “DANGER: HIGH VOLTAGE” in bright red lettering. Below this, a series of smaller images with concise text descriptions would highlight key safety precautions: An image of a person wearing safety glasses and gloves with the text “Wear PPE”; an image of a fire extinguisher with the text “Keep Fire Extinguisher Nearby”; an image of a wrench disconnecting a battery terminal with the text “Disconnect Battery Before Working”; an image of a well-ventilated area with the text “Ensure Good Ventilation”.
The poster would also include contact information for emergency services.
Mastering your travel trailer’s battery switch is a fundamental skill for any RV enthusiast. From understanding the various switch types and their functionalities to performing basic maintenance and troubleshooting, this guide has equipped you with the knowledge to keep your power flowing smoothly. Remember to always prioritize safety when working with electrical systems, and don’t hesitate to consult a professional if you encounter any significant problems.
Happy travels!
Frequently Asked Questions
What happens if I accidentally leave my battery switch in the “off” position?
You’ll lose power to your house batteries, meaning no lights, appliances, or water pump. You might also lose any settings stored in electronic devices powered by the house batteries.
How often should I clean my battery switch connections?
At least once a year, or more often if you notice corrosion. Spring and fall are good times to check.
Can I use a battery switch from a different RV?
Potentially, but it’s crucial to ensure the amperage rating is appropriate for your system. It’s generally safer to use a switch specifically designed for your travel trailer’s electrical setup.
My battery switch is stuck. What should I do?
Try lubricating the switch mechanism with a suitable lubricant (like WD-40). If it’s still stuck, you may need to replace the switch.
